Recording Technology
Setup process of conducting an online interview
In spite of the various online interview tools available, Zoom seems to be the most practical due to its convenient accessibility and familiarity. The steps for using Zoom to conduct online interviews are as follows:
-
Zoom Audio/Video recording settings
1. Schedule an interview on Zoom and send the link to the interviewee.
-
- The title of your Zoom meeting should include the following: “Title of the project – Your Name – Interviewee’s Name – Date and Time”
- Enable “join before host”
- Make sure that the video is set to automatically turn on
2. Make sure Zoom records to the cloud in the recording settings
3. You may want to consider using a better microphone such as a USB mic or a headset rather than the built-in microphone found in your computer. Make sure your narrator does the same.
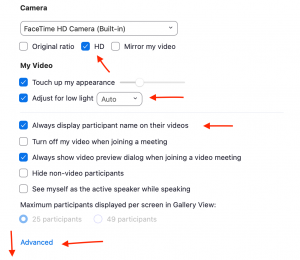
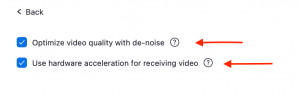
4. The Zoom setting for video should look like this:
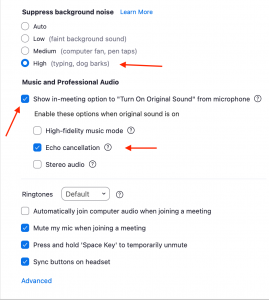
5. Make sure the Zoom setting for audio looks like this:
-
-
-
Recording
- Zoom has a Record option in the bottom right of your screen; you must select the second option to record to the cloud, otherwise you will not get a transcript.) Inform your narrator that you’re recording.
- Set screen to “speaker view”
- If you need to take a break, pause your Zoom recording rather than stopping it.
- When the interview is finished, you can just close your Zoom application and select the option to “End meeting for all.” This will begin the process of creating your audio files in mp4 and m4a formats.
-
-
-
After the Interview
- The recording might not show up immediately, or may not be available in one day. You might also have to wait until the next day to download the transcription. Go to the Zoom portal website and sign in to your Zoom account to download the recording.
- Download all three files (MP4, M4A, VTT) when they are ready. Name each recording file immediately using the convention and save them to a suitable location.[1][2]
-
-
-
Backup Audio Recording
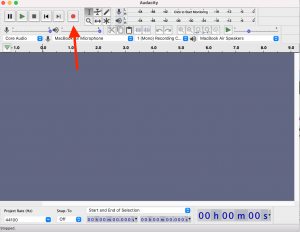
- Install and open Audacity
- Click the red record button
- Start the backup recording before starting the Zoom recording
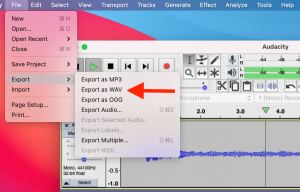
- Stop recording after you stopped recording in Zoom. Then go to the file in the Audacity app and select export as WAV. Name the recording file immediately using the file name convention and save them to a suitable location.
-
-
- Columbia Center for Oral History Research (2020, August). Retrieved from https://www.oralhistory.org/wp-content/uploads/2020/08/NYC-Covid-19-Oral-History-Narrative-and-Memory-Project-Case-Study.pdf ↵
- University of California Berkeley (2020, July). Retrieved March 20, 2021, from https://www.lib.berkeley.edu/sites/default/files/files/RemoteInterviewingForZoom%2C%2007-13-20.pdf ↵
